Setting up a Bastion Node on a GCP Cluster
Follow the instructions on this page to create Qubole clusters with bastion nodes on GCP. A bastion host is a special purpose GCP instance that provides SSH access to Qubole’s NAT gateway into your VPC and acts as a proxy to GCP instances running within your VPC.
Step 1: Creating the bastion node
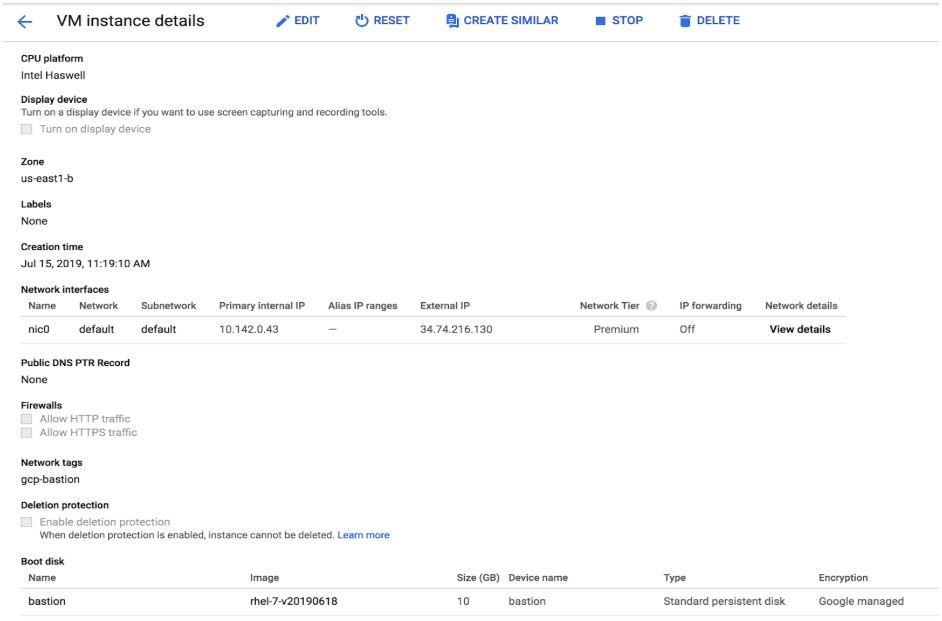
Create a VM instance on the Google Cloud Console with the following specifications. This will serve as the bastion node.
- Select a region and a zone. They must match the region and zone of your cluster. This example uses us-east-1 as the region and us-east-1b as the zone.
- Select either Centos 7 or Red Hat Enterprise Linux 7 as the operating system.
- Add a network tag to this host. This will be used to assign firewall rules and control traffic in and out of the bastion. You can use any valid GCP network tag name. In this example, the network tag is gcp-bastion.
Note
- Assign an static IP address to the Network Interface to avoid problems when restarting the instance.
- Avoid using spot instances as a bastion node.
The VM will look similar to this:

Step 2: Setting up firewall rules
From VPC Network -> Firewall Rules on the Google Cloud Console, add the following firewall rules.
- Allow ssh traffic on TCP:22 from Qubole’s NAT IP (34.73.1.130/32) to the bastion using the network tag created in step 1c above.
- Allow access on TCP:7000 from the cluster’s region’s IP address range to the bastion using the network tag created in step 1c above. The IP address range for a given region can be obtained by navigating to VPC Network > VPC Networks on the Google Cloud Console.
Once created, your firewall rules will look similar to this:

Step 3: Configuring the bastion node
In this example, ssh is set up using the username bastion-user on the bastion node. You can set it up with a username of your choosing.
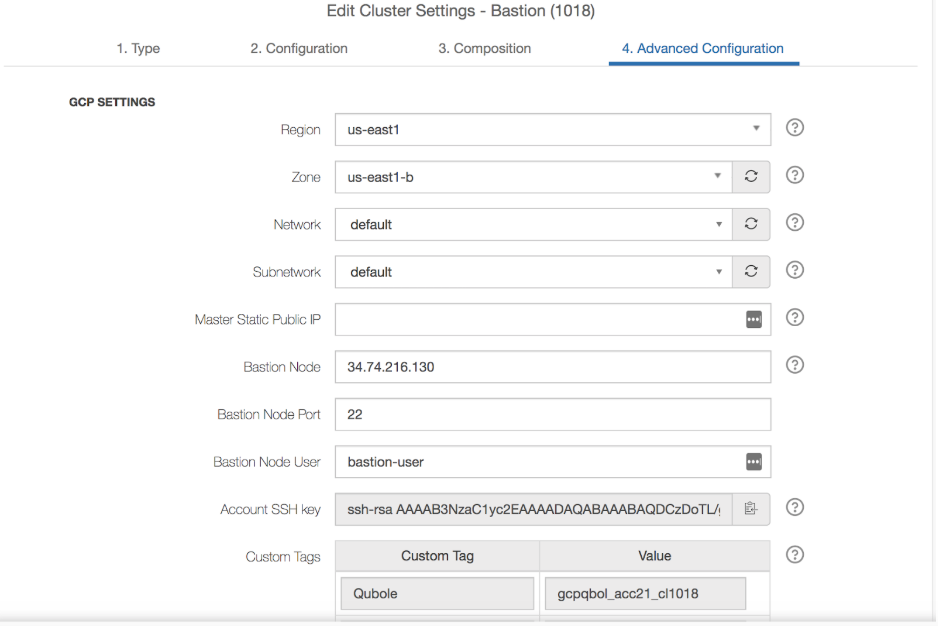
Copy the ssh key for your cluster from the Account SSH key field in the Edit Cluster Settings > Advanced Configuration tab of the QDS UI.
Add the ssh key from step 3a as an authorized user on the bastion node by ssh-ing into the bastion node and running the following commands on a shell as a root user.
useradd bastion-user -p ''
mkdir -p /home/bastion-user/.ssh
chown -R bastion-user:bastion-user /home/bastion-user/.ssh
Add the ssh key obtained from step 3a as an authorized user by opening up /home/bastion-user/.ssh/authorized_keys in an editor of your choice and pasting the key in the file.
Run the following steps on the shell to complete the setup.
bash -c 'echo "GatewayPorts yes" >> /etc/ssh/sshd_config'
sudo service sshd restart
Step 4: Configuring your cluster
After configuring the bastion node, bring up the cluster in the Advanced Configuration tab of the QDS UI. The cluster settings should look similar to this:

Step 5: Verifying your setup
Once your cluster is up, perform the following steps to verify the setup. This will confirm that the cluster is running successfully with a bastion node.
Verify that port 7000 is open on the bastion node by running the following command on the bastion node:
sudo netstat -nlp | grep 7000
Verify that port 10000 is open on the coordinator node by running the following command on the coordinator node:
sudo netstat -nlp | grep 10000