Accessing JupyterLab Interface
You can access the JupyterLab interface, which is the next generation user interface for Jupyter, to create and manage Jupyter .ipynb notebooks.
From the Home page, navigate to Notebooks >> Jupyter.
Select a Spark cluster from the drop-down list, and click Open. Spark clusters with versions 2.2 and later are displayed in the drop-down list.
If the selected cluster is running, then the JupyterLab interface is launched.
If the selected cluster is not running, the cluster is started when you click Open. After the cluster is started, the JupyterLab interface is launched.
Alternatively, you can also access the JupyterLab interface from the Clusters page. Click on Resources for a Spark cluster, and select Jupyter from the menu.
After the interface is launched, you can see the associated cluster on the top right corner. To change the associated cluster perform the following steps:
- Click on the down arrow and select the required cluster.
- If you select a cluster that is not running, then initial UI of the JupyterLab interface is opened.
- Select the required cluster, and click Open.
The following JupyterLab interface with labels provides an overview with respect to the layout and menu options that help you create and manage Jupyter notebooks.
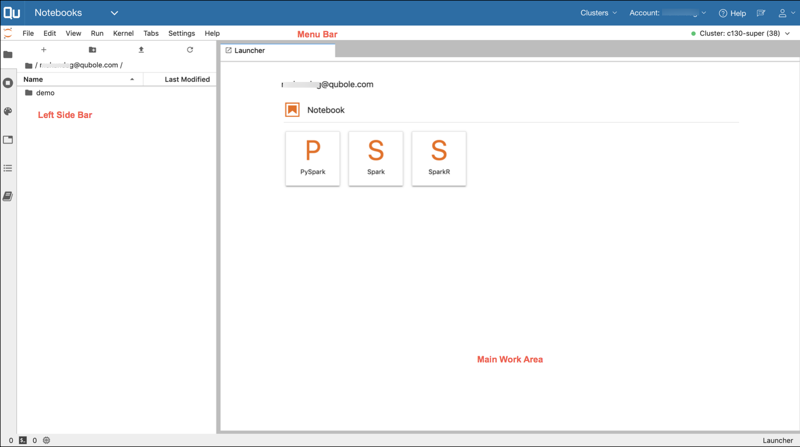
The Menu Bar is at the top of the interface. The default menus are:
- File: Actions related to notebooks.
- Edit: Actions related to editing notebooks and other activities.
- View: Actions that alter the appearance of JupyterLab interface.
- Run: Actions for running code in notebooks.
- Kernel: Actions for managing kernels, which are separate processes for running code.
- Tabs: A list of the open documents and activities in the dock panel.
- Settings: Common settings and an advanced settings editor.
- Help: Example notebooks, and a list of JupyterLab and kernel help links.
The Left Sidebar has the following options:
- File Browser: Displays working directory and folders. Displays buttons for starting a new launcher, adding a folder, uploading file and refresh file list.
- Running: Displays running kernels.
- Commands Pallete: Lists all the supported commands. You can search for any command by using the search option.
- Noteook Tools: Lists all the tools for the Jupyter notebooks.
- Open Tabs: Lists all the open windows.
- Table of Contents: Displays the table of contents of a selected notebook.
- Example Notebooks: Lists the available sample notebooks to help you get started.
The Main Work Area shows the launcher with the supported kernels option for Jupyter notebooks. The notebooks are opened in the Main Work Area.