Understanding Cluster Operations
This section explains cluster operations such as start, terminate, add, clone, and delete a cluster.
How to Start or Terminate a Cluster
The current state of the cluster is indicated by the icon on the extreme left of each row in the cluster table. It is a green circle for a running cluster, a red circle for a terminated cluster and an arrow pointing up or down for clusters that are starting up or terminating, respectively.
Click the Start button to start a cluster or restart a stopped cluster.
A dialog box prompts for confirmation. Click OK to start a cluster. Click Cancel if you do not want to start a cluster.
Caution
You must not manually launch instances in the security groups created by Qubole when a cluster is active. Launching instances in the Qubole security groups would result in the incorrect display of the number of nodes in the Clusters UI page.
Ensure to provide a persistent security group when you configure outbound communication from cluster nodes to pass through a Internet proxy server. You can configure a persistent security group in Advanced Configuration tab of that cluster’s UI.
Click the Stop button to terminate a running cluster.
A dialog box prompts for confirmation. Click OK to terminate a cluster. Click Cancel if you do not want to terminate a cluster.
Click the refresh icon  that is on the top-right corner of the Clusters page to refresh the clusters
status.
that is on the top-right corner of the Clusters page to refresh the clusters
status.
How to Add a Cluster
To add a cluster, click the New button on the Clusters page.
The Create New Cluster page is displayed. Enter the following details to create a new cluster:
- Cluster Labels: A list of comma-separated labels to uniquely identify the cluster. This is a mandatory field.
- For more information on the rest of the parameters, see Configuring Clusters and Managing Clusters.
Click Save to create the new cluster.
How to Clone a Cluster
Cloning may be preferable to creating a new cluster in many cases since most of the fields are copied from an existing cluster.
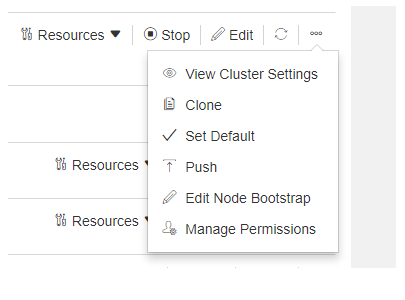
To clone a cluster, click the ellipse icon listed against the cluster.
Select Clone from the list of options as shown in the following figure.
The Clone a Cluster page is displayed. Enter a new label for the cluster. Make the required modifications and click Save to clone the cluster. The label is the only mandatory field to be changed when you clone a cluster.
Clicking Clone takes you to the Edit Clusters page.
How to Modify a Cluster
To edit a cluster, click the Edit button available in the Action column.
The Edit Cluster page is displayed. The current configuration of the cluster is displayed on this page. You can make the desired modifications to it. See Managing Clusters for more information. Click Save to save the modifications.
How to Push Configuration Changes to a Cluster
Most cluster changes take effect only when a cluster is restarted, but some can be pushed to a running cluster. Changes to the following cluster attributes can be pushed to a running cluster:
- The maximum size of the cluster
- The minimum size of the cluster
- The Fair Scheduler configuration
- The default Fair Scheduler queue
- The Hadoop configuration variables
To push configuration changes to a running cluster, click the ellipse icon next to the cluster.
Select Push from the list of options:
The resulting Edit Cluster page shows all settings of the cluster; pushable fields are marked with a P. QDS allows modifying editable fields besides the pushable fields but changes to those fields (without a P) take effect only after a cluster restart.
Note
In case of a Presto cluster, the P icon is marked for the Presto Overrides but it is not applicable to all properties except a few autoscaling properties listed in Autoscaling properties. If you try to push configuration properties (that you had removed), the value of such configuration properties do not get refreshed in the running cluster as it continues to be the same value used before.
After making changes, you can click one of the two options:
- Update and Push - To push the changes of all pushable fields to the running cluster. When you click Update and Push, a dialog prompts you for confirmation; click Update and Push again.
- Update only - To make changes that takes effect only after the cluster restarts.
How to Delete a Cluster
Note
Running clusters, and the cluster labeled default, cannot be deleted.
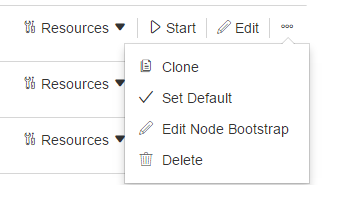
To delete a cluster, click the ellipse icon next to the cluster.
Select Delete from the list of options as shown in the following figure.
A dialog box prompts for confirmation. Click Ok to delete the cluster or Cancel to keep it.
Warning
Once a cluster has been deleted, it cannot be retrieved.
Switching Clusters
Clusters are identified by labels. When you want to switch a workload from one cluster to another, you can reassign the clusters’ labels. To do this, hover the mouse on the 3 vertical dots to the left of the cluster label and drag the label to another cluster.
You can also view the commands that have run on a specific cluster by clicking on the label name.